JIRA App Integration Example
Faction can extend its functionality on the server side. If you are familiar with writing BurpSuite extensions then this process should be somewhat familiar to you. If you are not it’s OK. We will walk through the specifics below.
In this example, we will create a JIRA plugin that will create issues for each vulnerability when the assessment is finalized.
The source code for this example can be downloaded here.
Extension Requirements
- Create a new Eclipse Maven Java Project.
- Modify your pom.xml file to enable the Faction Extender API and ensure your manifest includes Title, Version, Author, and URL as shown below.
<project xmlns="http://maven.apache.org/POM/4.0.0" xmlns:xsi="http://www.w3.org/2001/XMLSchema-instance" xsi:schemaLocation="http://maven.apache.org/POM/4.0.0 https://maven.apache.org/xsd/maven-4.0.0.xsd"> <modelVersion>4.0.0</modelVersion> <groupId>faction-jira-extension</groupId> <artifactId>faction-jira-extension</artifactId> <version>1.0</version> <name>Faction Jira Extension</name> <dependencies> <dependency> <groupId>com.factionsecurity</groupId> <artifactId>faction-extender</artifactId> <version>2.5</version> </dependency> </dependencies> <build> <plugins> <plugin> <artifactId>maven-assembly-plugin</artifactId> <configuration> <descriptorRefs> <descriptorRef>jar-with-dependencies</descriptorRef> </descriptorRefs> <archive> <manifestEntries> <Title>${project.name}</Title> <Version>${project.version}</Version> <Author>Josh Summitt</Author> <URL>https://www.factionsecurity.com</URL> </manifestEntries> </archive> </configuration> </plugin> </plugins> </build> </project> - Create the following folders and files. They can be empty for now. We will fill this out in the next section below.
 The maven-assembly-plugin will ensure your manifest is set up correctly for Faction to be able to import your extension with the proper information.
Extension File and Folder Requirements
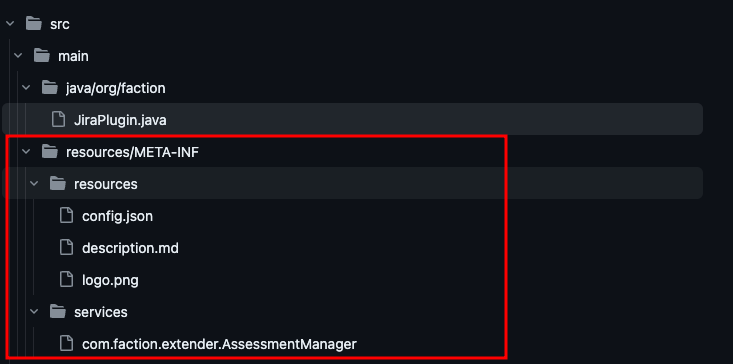
We need to update the extension resources from Step 3 above. Below is a description of the files.

resources/META-INF/resources/config.json: This file is a JSON key-value pair of options you want to be configurable by the end user. These options become input boxes in the Faction App Store UI.resources/META-INF/resources/description.md: This is the extension description and help files that will be displayed when the extension is loaded in the Faction App Store UIresources/META-INF/resources/logo.png: This is a PNG logo that will be displayed as the App's icon in the Faction App Store UIresources/META-INF/services/*: This file is required for Faction to be able to load your extension.
config.json
These are the key value pairs that will display in the Faction App Store UI and allow users to make changes that affect the behavior of the extensions. For a Jira plugin you would want the API, the Jira Host and the Jira Username configured. That would look like the following
{
    "Jira Host" : {
        "type": "text",
        "value": "https://yourhost.com"
        },
    "Jira API Key" : {
        "type": "password",
        "value": "your api key"
        },
    "Jira Email": {
        "type" : "text",
        "value": "your@email.com"
    }
}
Any values you set in your extension will be the "Default" values that will display to the end user. They can be blank if you do not want to set a predefined value.
The type attribute can only be text or password. password attributes are not displayed in the UI when the user enters the data and do not get returned to the UI once saved.
description.md
This is where you describe your extension to end users and support most markdown elements. You should use this to fully describe what the extension does, why the user should install it, and how the end user should configure it to work correctly.
logo.png
This will be the logo in a PNG format that will display as an icon for your project.
services
The resources/META-INF/services/ files have a specific naming convention so that Faction can load your classes. The file must be named one of the following:
com.faction.extender.AssessmentManagercom.faction.extender.ApplicationInventorycom.faction.extender.ReportManagercom.faction.extender.VerificationManagercom.faction.extender.VulnerabilityManager
The content of each file is the name of your class that instantiates this functionality. In this example, we are only triggering the AssessmentManager therefore the file name would be com.faction.extender.AssessmentManager and the contents of the file would be org.faction.JiraPlugin
Create The Jira Plugin Class
Now that the basic set up is complete we can create our Jira Class that actually does something!
Create a Class named JiraPlugin in src/main/java. This class will implement com.faction.extender.AssessmentManager as shown below. This code will trigger whenever a change happens to an assessment. You can use the Operation enum to control what happens as different events change the assessment.
package org.faction;

public class JiraPlugin extends BaseExtension implements com.faction.extender.AssessmentManager{
     @Override
     public AssessmentManagerResult assessmentChange(Assessment assessment, List<Vulnerability> vulnerabilities, Operation arg2) {
         AssessmentManagerResult result = new AssessmentManagerResult();
        return result
     }
}
Note that above it returns AssessmentManagerResult. This object will update Faction’s database if the values change when this function returns. If you Return null it will NOT update Faction and only just send/process information.
Send These Issues to Jira on Assessment Finalized
Now we have a basic functional block of code we need to make it perform the action of sending all vulnerabilities to Jira only when the assessment is finalized. To do this we create an if statement that checks the Operation enum equals Finalized and then sends the issues with our custom function sendVulnerabilityToJira(). We then get the tracking ID from Jira and update Faction so the tracking IDs are in sync.
import com.fuse.elements.Assessment;
import com.fuse.elements.Vulnerability;

public class JiraPlugin extends BaseExtension implements com.faction.extender.AssessmentManager{

    @Override
    public AssessmentManagerResult assessmentChange(Assessment assessment, List<Vulnerability> vulns, Operation opcode) {
        String project ="KAN";  //Default Jira Project Name.

        if(opcode == Operation.Finalize) {
            //Integration into vulnerability management system
            for(Vulnerability vuln : vulns) {
                //this can update vulns and send the updated values back into Faction
                String issueId = sendVulnerabilityToJira(vuln, project);
                if(issueId != null) {
                    vuln.setTracking(issueId); //Update Faction's Tracking ID
                }
            }
        }
        AssessmentManagerResult result = new AssessmentManagerResult();
        result.setAssessment(assessment);
        result.setVulnerabilities(vulns);
        return result; //Send back the updated results
    }
}
You can see the full implementation here
Install It In Your Faction
Build the jar file by running:
This will create a jar file named something like JiraPlugin-0.0.1-SNAPSHOT-jar-with-dependencies.jar in your ./target folder.
Upload it to Admin->App Store->Install Extension. It should display like this:
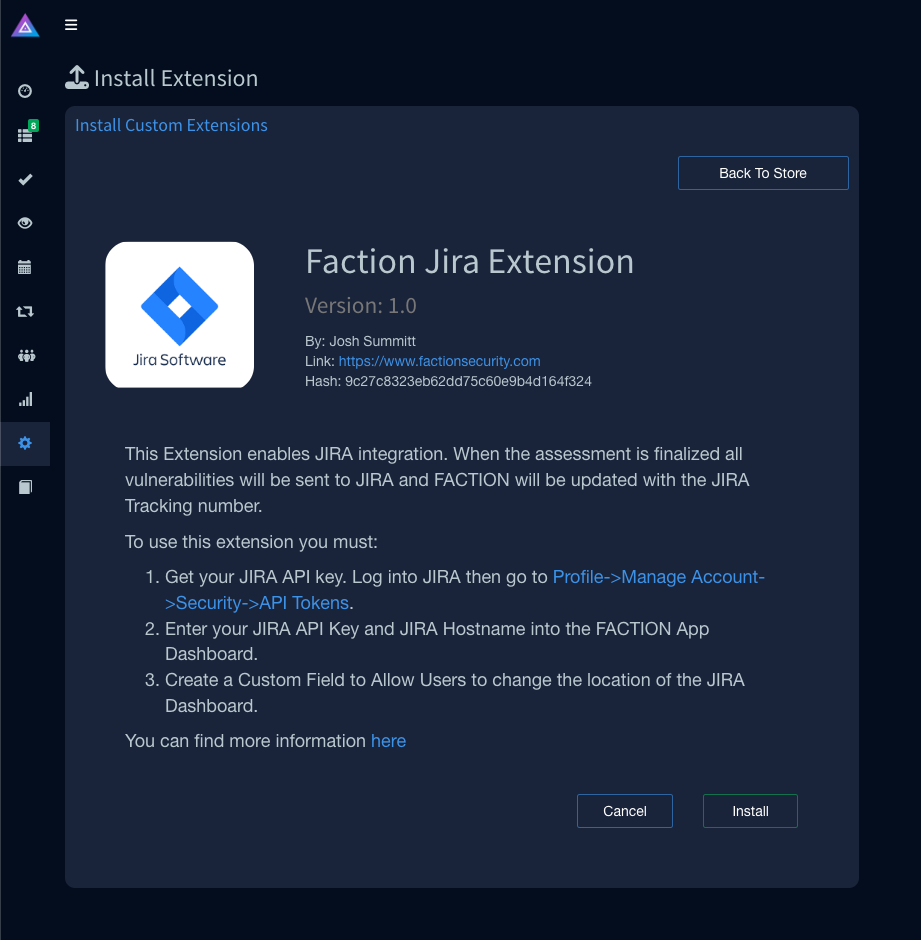
If all looks good, click install.
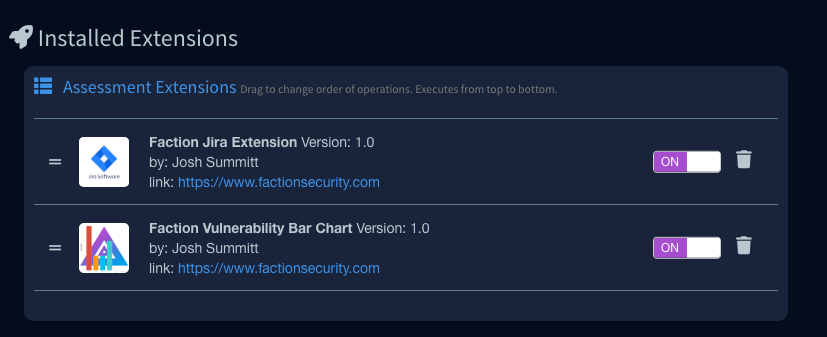
It will be installed initially as disabled. You can configure it before you enable it by clicking on the extension in the list:

Once you configure the settings you can enable it.
Now when an assessment is finalized it will add all the findings to JIRA as shown in the following screenshot:
