Using Docx Report Templates

The Faction Report Designer allows you to create custom security report templates for each assessment type. When building reports, you need to use the variables listed below. Entering these into your DOCX reports will auto-replace the assessment and vulnerability text when the report is generated. You can even use the same variables in many of Factions's Input fields outside of the report template (like Risk Assessment Summaries), and it will auto-populate the fields when the report is generated.
You can download the sample templates here: Sample Templates
Note
You should disable spellcheck in your template document while adding variables. The spellcheck can cause the variables to contain attributes that will make the variable unrecognizable to the Faction document parser.
Note
If you get an error about a malformed file after the report is generated, try opening the template in LibreOffice and saving it before uploading the template to Faction.
GENERAL VARIABLES:
All of these variables can be used anywhere in the DOCX template. Those with a star ⭐️ can be used in the web interface to assist in creating common reusable templates.
- ${TOC} – Placeholder for the Table of Contents
- ${summary1} – The high level summary
- ${summary2} – The objective and scope
- ${asmtId} – Internal Database ID ⭐️
- ${asmtAppid} – The assigned Application ID ⭐️
- ${asmtName} – The Assessment Name ⭐️
- ${asmtAssessor} – The first assessor assigned to the assessment ⭐️
- ${asmtAssessor_Email} – The first assessor email address ⭐️
- ${asmtAssessor_Email link} - Must be used in a hyperlink. Will prepend "mailto:" to ensure the hyperlink works correctly
- ${asmtAssessors_Lines} – All Assessors split into lines ⭐️
- ${asmtAssessors_Comma} – All Assessors split into a comma delimited list ⭐️
- ${asmtAssessor_Bullets} – All Assessors split into a bulleted list ⭐️
- ${remediation} – The Remediation Person assigned to the assessment ⭐️
- ${riskCount*} – The number of findings at the RiskLevel 0-9 ⭐️
- ${riskTotal} – The total number of findings at all RiskLevels ⭐️
- ${asmtTeam} – The Assessor Team Name ⭐️
- ${asmtType} – The Type of the Assessment ⭐️
- ${asmtStart} – The Start date of the assessment ⭐️
- ${asmtStart mm/DD/yyyy} – The Start date of the assessment with date formatting. Uses Java Simple Date format ⭐️
- ${asmtEnd} – The End date of the assessment ⭐️
- ${asmtEnd mm/DD/yyyy} – The End date of the assessment with date formatting. Uses Java Simple Date format ⭐️
- ${asmtAccessKey} – Guid to access the client retest queue. ⭐️
- ${today} – Day the report is generated ⭐️
- ${today mm/DD/yyyy} – Day the report is generated with date formatting. Uses Java Simple Date format ⭐️
- ${cfXXXXXX} – Custom Fields are ones you specify in the admin interface. These are all prefixed with “cf” ⭐️
- ${totalOpenVulns} - Can be used in retest reports to show a count of open vulnerabilities. (Since 1.3)
- ${totalClosedVulns} - Can be used in retest reports to show the total count of closed vulnerabilities. (Since 1.3)
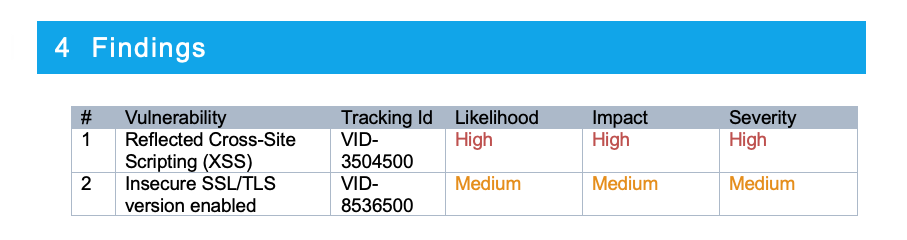
VULNERABILITY TABLES VARIABLES:
This is one of two methods to configure your technical findings or vulnerability summaries. This method will require you to create a specially crafted table in your DOCX Report Template. See an example on GitHub.
These are only available inside tables.
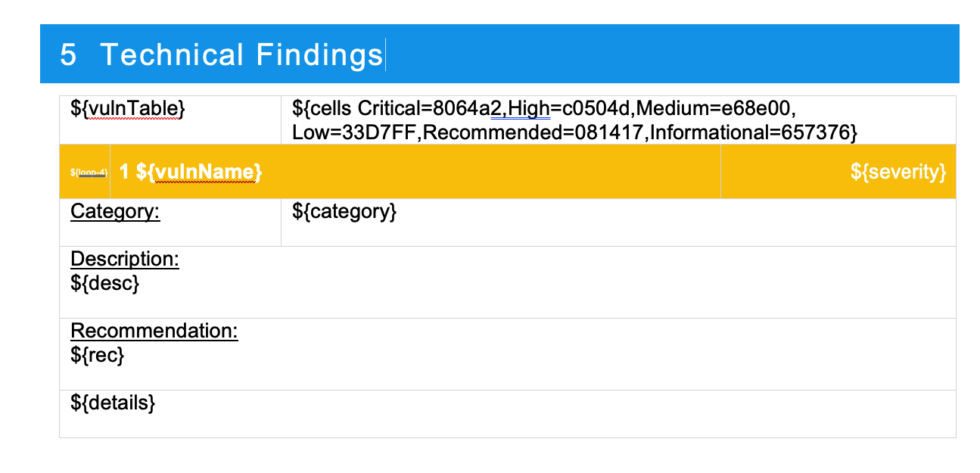
- ${vulnTable} – This defines a table to be a vulnerability listing table.
- ${vulnTable Section_Name} – This defines a table to be a vulnerability listing table for a section of vulnerabilities. See Reporting Sections(Paid Only Feature).
- ${vulnName} – The Vulnerability name
- ${rec} – Vulnerability Recommendation
- ${desc} – Vulnerability Description
- ${category} – Category of the vulnerability
- ${severity} – Severity of each vulnerability.
- ${likelihood} – Likelihood of the vulnerability
- ${impact} – Impact of the vulnerability
- ${cvssScore} – CVSS score of the vulnerability
- ${cvssString} – CVSS vector of the vulnerability
- ${cvssString link} – CVSS vector can only be used in a hyperlink. This will automatically create a link to the first.org CVSS calculator.
- ${count} – Row Count of the vulnerability
- ${tracking} – Tracking number of the vulnerability
- ${vid} – Vulnerability internal database id
- ${openedAt} - The date the vulnerability began tracking
- ${closedAt} - The date the vulnerability was closed (no longer tracked)
- ${remediationStatus} - Displays only "Open" or "Closed"
- ${cfXXXXXX} – Custom Fields are ones you specify in the admin interface. These are all prefixed with “cf”
- ${color key=value,key=value} – The color of the text is based on key-value pairs. See below for how to set up colors.
- ${cells key=value,key=value} – The color of the table cell is based on key-value pairs. See below for how to set up colors.
- ${custom-fields key,value,key=value,...} - The color to match in the DOCX template. This allows you to set font colors for custom variables
- ${loop} – This variable tells the report generator which row will be repeated.
- ${loop-*} – This allows multiple rows to be repeated. Example ${loop-1} will repeat the row but the one below it.
- ${details} – This will insert screenshots and exploit steps for each vulnerability.
- ${noIssuesText} - This is the default text displayed in the section if no vulnerabilities are reported. (Since 1.3.28)
Example Table Summary Table
The ${loop} variable will allow the report generation to iterate each vulnerability into one row.
| ${vulnTable} | ${color Critical=C00000,High=FFC000} | ||
| ID | Finding Name | Impact | Severity |
| ${loop} | ${count}. ${vulnName} | ${impact} | ${severity} |
Example in DOCX template:
 Example Rendered:
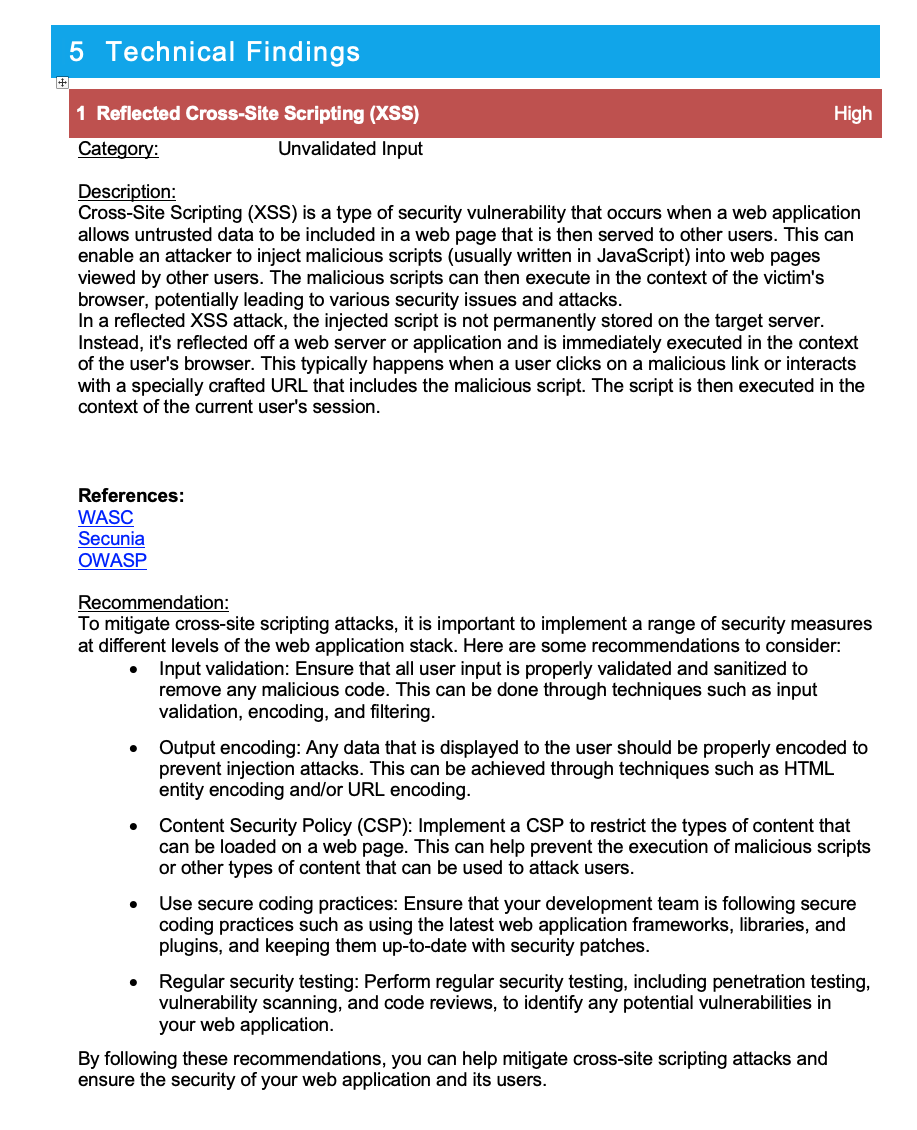
Example Table Detail Table
The ${loop-4} variable will allow the report generation to iterate each vulnerability over 4 rows below the loop for a total of 5 rows that will be repeated.
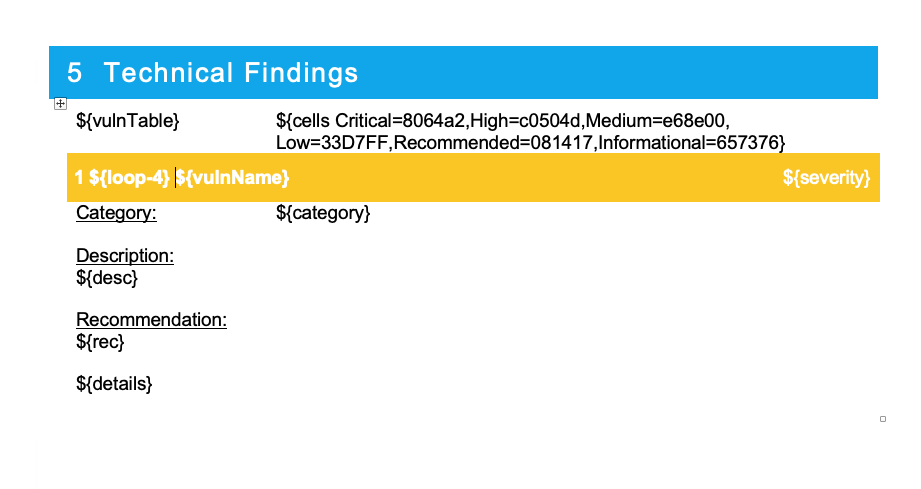
**Why is the heading yellow?!?! Check here
Example Rendered:
VULNERABILITY BLOCK VARIABLES:
For when you do not want to use tables to display your vulnerability information. You can use the following variables for inserting vulnerability information outside of a table.
This method takes a block of text with all formatting between ${fiBegin} and ${fiEnd} to use as a vulnerability template. This can contain any DOCX elements, including tables.
- ${fiBegin} / ${fiEnd} – Block to repeat against all findings.
- ${fiBegin Section_Name} / ${fiEnd Section_Name} – Block to repeat a section of findings. See Reporting Sections (Paid Only Feature)
- ${vulnName} – The Vulnerability name
- ${rec} – Vulnerability Recommendation
- ${desc} – Vulnerability Description
- ${category} – Category of the vulnerability
- ${severity} – Severity of each vulnerability.
- ${likelihood} – Likelihood of the vulnerability
- ${impact} – Impact of the vulnerability
- ${cvssScore} – CVSS score of the vulnerability
- ${cvssString} – CVSS vector of the vulnerability
- ${cvssString link} – CVSS vector can only be used in a hyperlink. This will automatically create a link to the first.org CVSS calculator.
- ${count} – Row Count of the vulnerability
- ${tracking} – Tracking number of the vulnerability
- ${vid} – Vulnerability internal database id
- ${openedAt} - The date the vulnerability began tracking
- ${closedAt} - The date the vulnerability was closed (no longer tracked)
- ${remediationStatus} - Displays only "Open" or "Closed"
- ${cfXXXXXX} – Custom Fields are ones you specify in the admin interface. These are all prefixed with “cf”
- ${details} – This will insert screenshots and exploit steps for each vulnerability.
- ${color key=value,key=value} – The color of the text is based on key-value pairs. See below for how to set up colors.
- ${fill key=value,key=value} – The color of the background elements is based on key-value pairs. See below for how to set up colors.
- ${custom-fields key,value,key=value,...} - The color to match in the DOCX template. This allows you to set font colors for custom variables
- ${noIssuesText} - This is the default text displayed in the section if no vulnerabilities are reported.
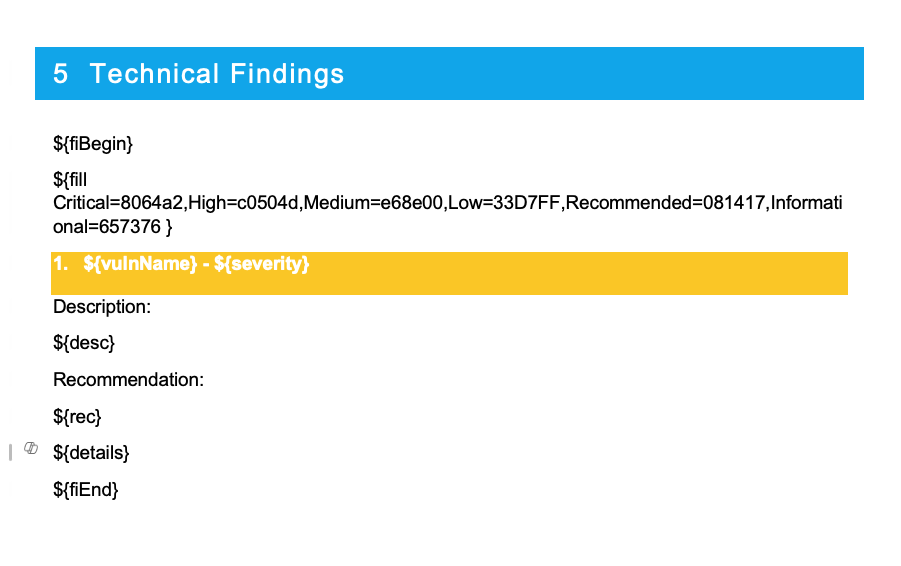
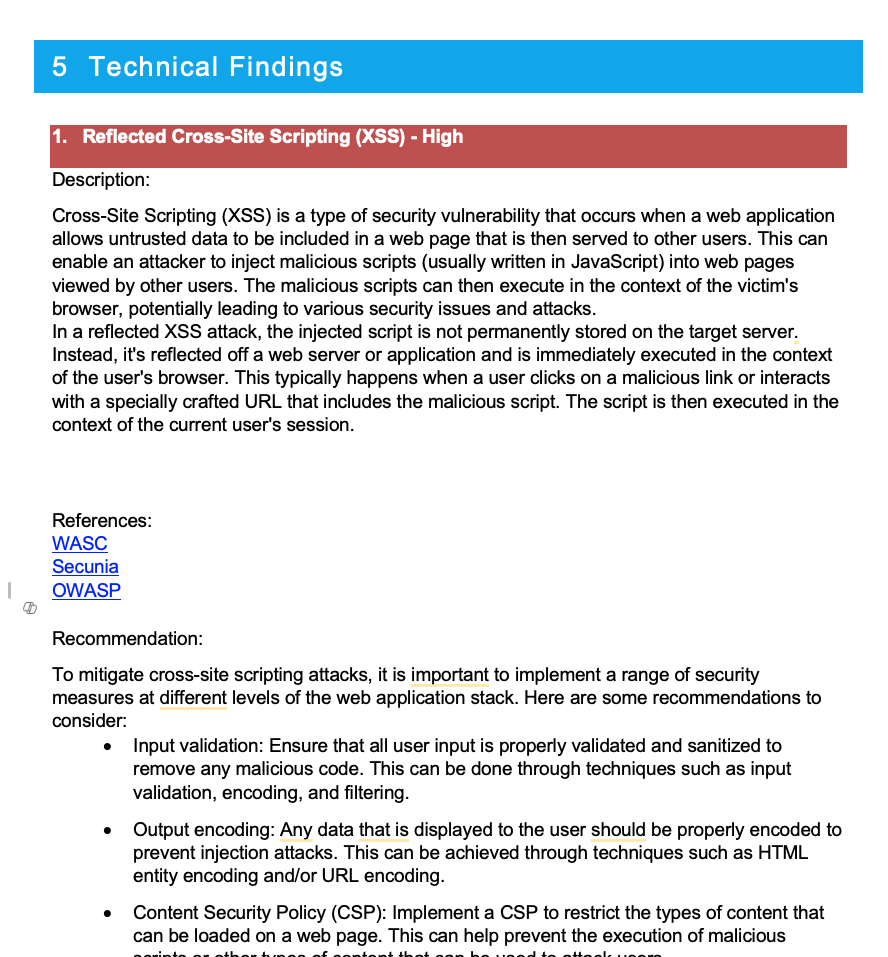
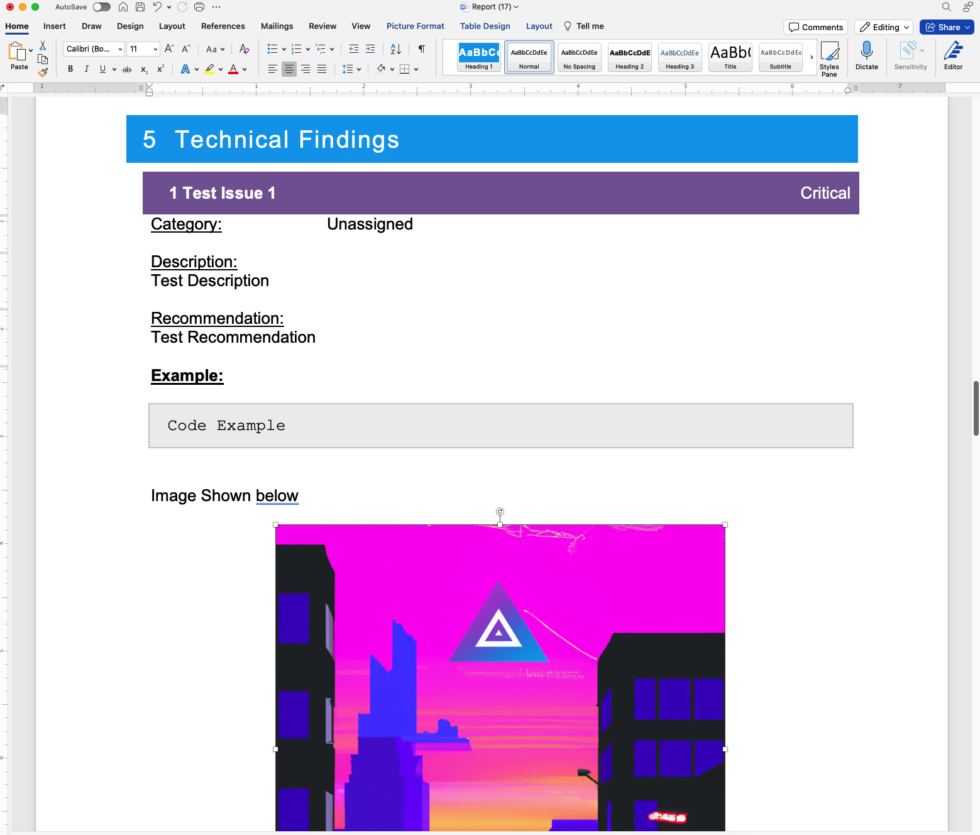
Example Block Findings
${fiBegin}

${fill Critical=8064a2,High=c0504d,Medium=e68e00,Low=33D7FF,Recommended=081417,Informational=657376}

## 1.     ${vulnName} - ${severity}

Description:

${desc}

Recommendation:

${rec}

${details}

${fiEnd}
**Why is the heading yellow?!?! Check here
Example Rendered:
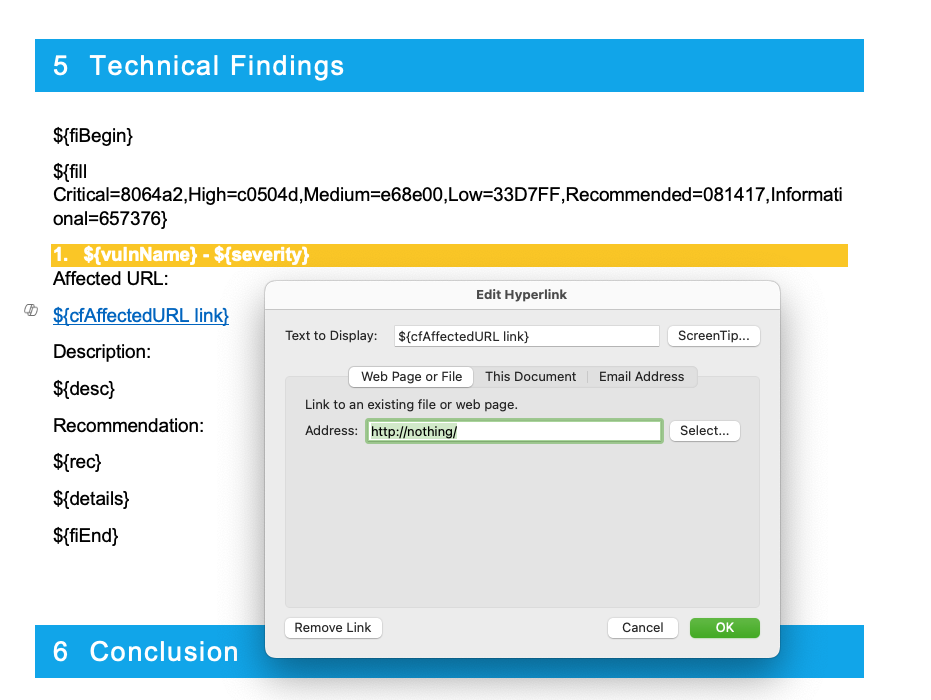
Hyperlinks
If you want to add hyperlinks to variables, this can be done with some variables by appending link after the variable. There are only a few default variables that support this feature (${asmtAssessor_Email link}, ${cvssString link}) but every Custom Variable will support this. This allows you to add things like ${cfAffectedURL link} to your Vulnerability templates which will generate a hyperlink to this what ever URL you enter.
Below is an example of how you would add this. Note that the "Address" in the DOCX template can be anything. It will be deleted and replaced with the User Defined Variable for Affected URL.
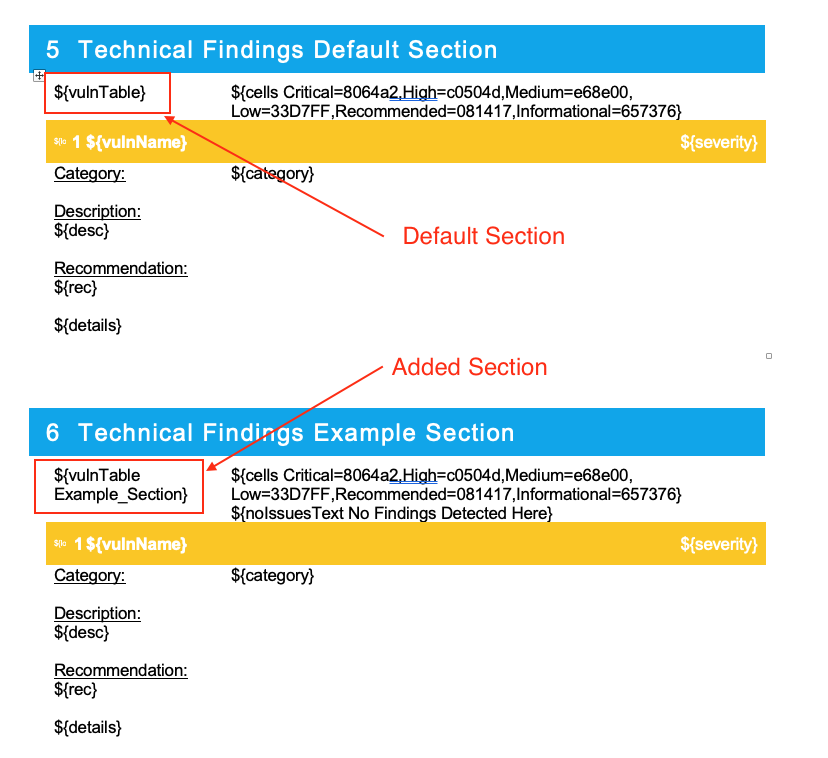
Reporting Sections (Enterprise/Paid Feature)
You can put findings into different sections of your report for paid versions and certain sponsored tiers of Faction. You may want to use sections if you are doing different types of pen tests in one report and need to keep these sections separated. For example, you can segregate findings into Application Security and Network Security Sections.
To use sections you need to create the section names in the Faction Report Designer:
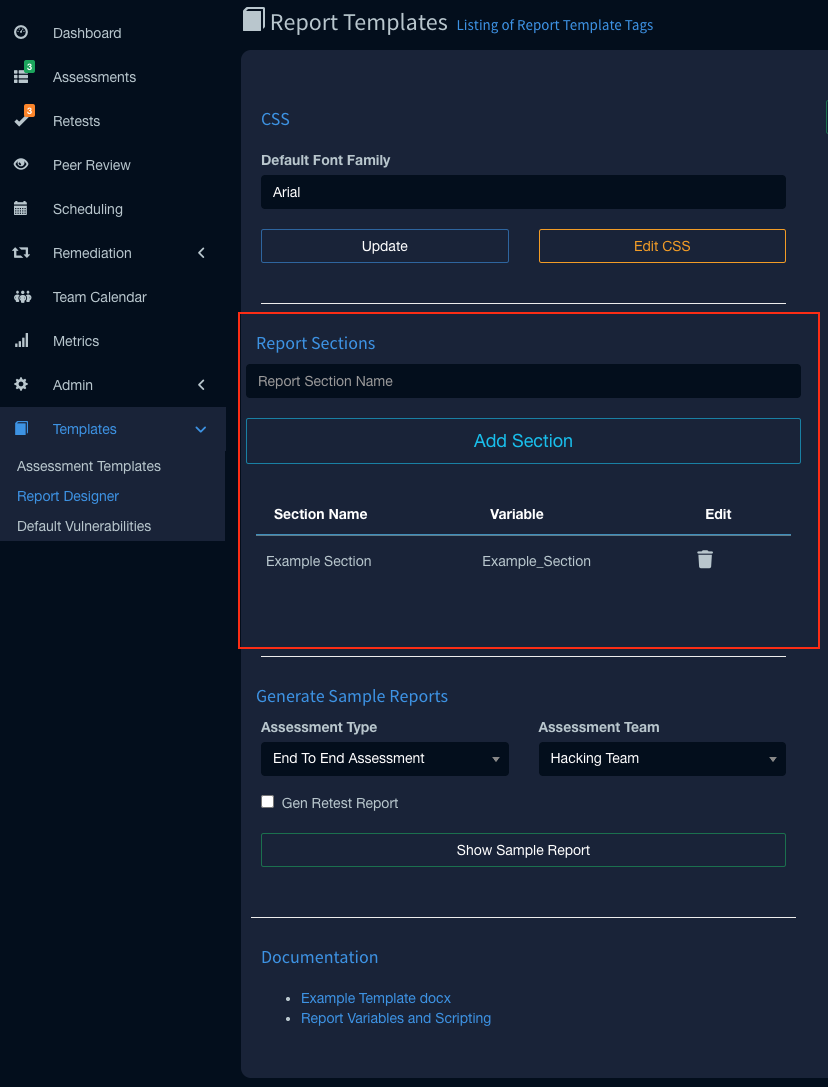
Once the sections are created in the UI, you can add them to the report in two ways.
1. Vulnerability Block Variables: ${fiBegin Your_Section_Name}/${fiEnd Your_Section_Name}
2. Vulnerability Table Variables:${vulnTable Your_Section_Name}`
Below is an example of how the template variables work:
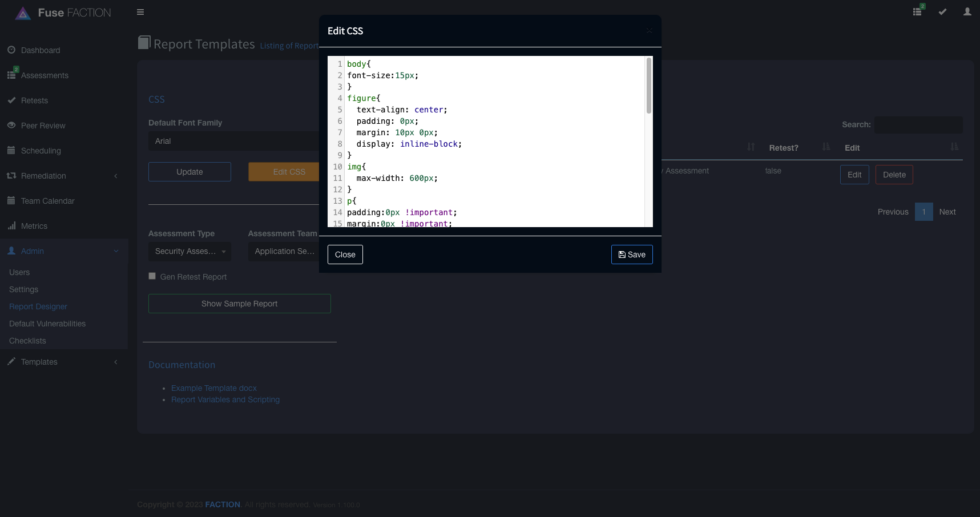
CSS FORMATTING:
All of the text generated from Faction is HTML. You can control how it is rendered in the DOCX format using the CSS editor in the Report Designer. You will need to set the CSS to match your report templates. Things like font and size will need to match. Images will need to be forced to resize to the correct dimensions to fit in your reports.
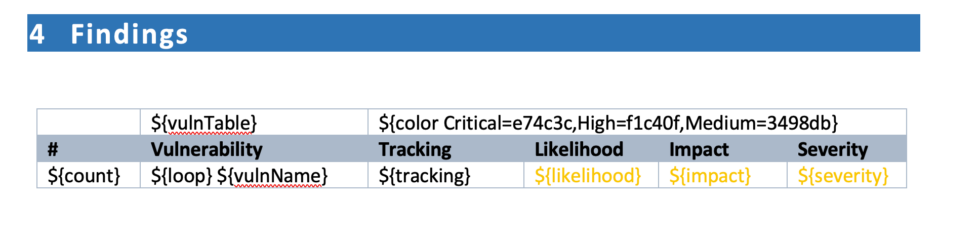
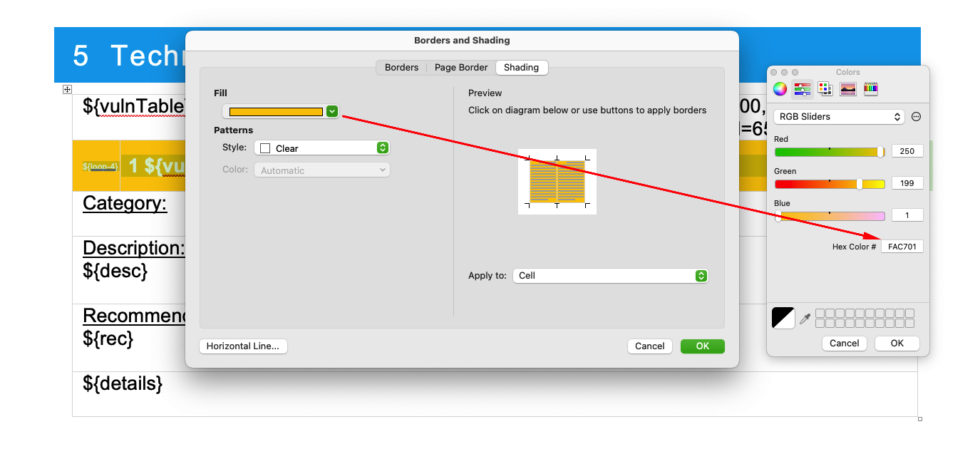
SETTING SEVERITY COLORS:
When building reports, you most likely will set the text or cell to the color that matches the severity of the finding. To achieve this in FACTION, you need to set a default color in the docx template that matches the severity category (i.e. Overall, Likelihood, and Impact). These default colors are in the table below:
| Category | Color Hex |
| Overall Severity | #FAC701 |
| Likelihood | #FAC702 |
| Impact | #FAC703 |
For Example, a table in MS Word below has pre-filled the color codes for each severity name and category.
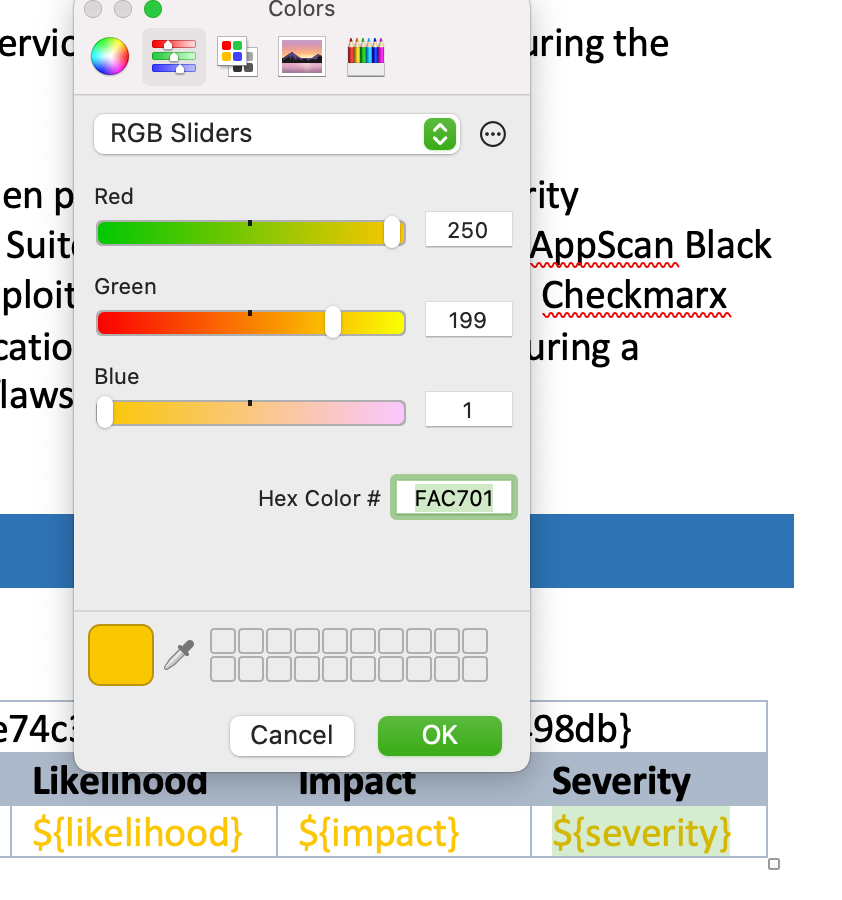
Right-click the overall severity variable, ${severity}; you can see the default hex code for this color is #FAC701. Likelihood would be set to #FAC02, and Impact would be set to #FAC703.
Setting the background color for cells works in much the same way. Notice we use the ${cells} variable instead.
Right-click on the cell and set the color you may only want to use the Overall severity option but you can have multiple cells with each category if you wish.
Below is an example of the generated report table with colors replaced.
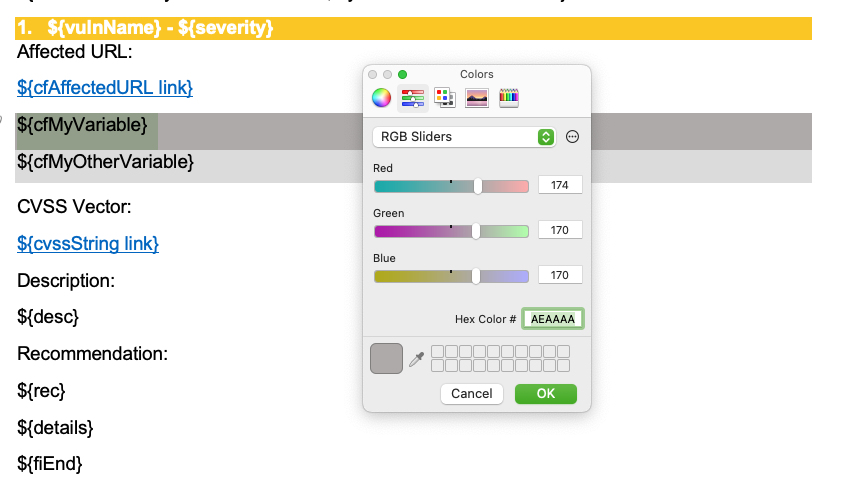
Setting Custom Variable Colors
Faction allows you to set up a color scheme to call out data in custom variables. You can use this to highlight things that require more attention or anything else you can imagine.
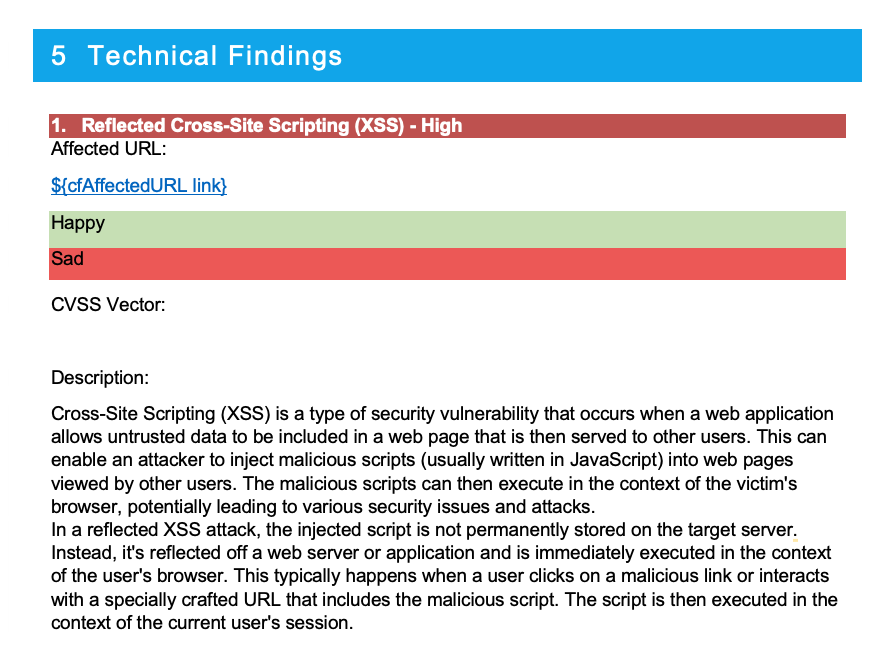
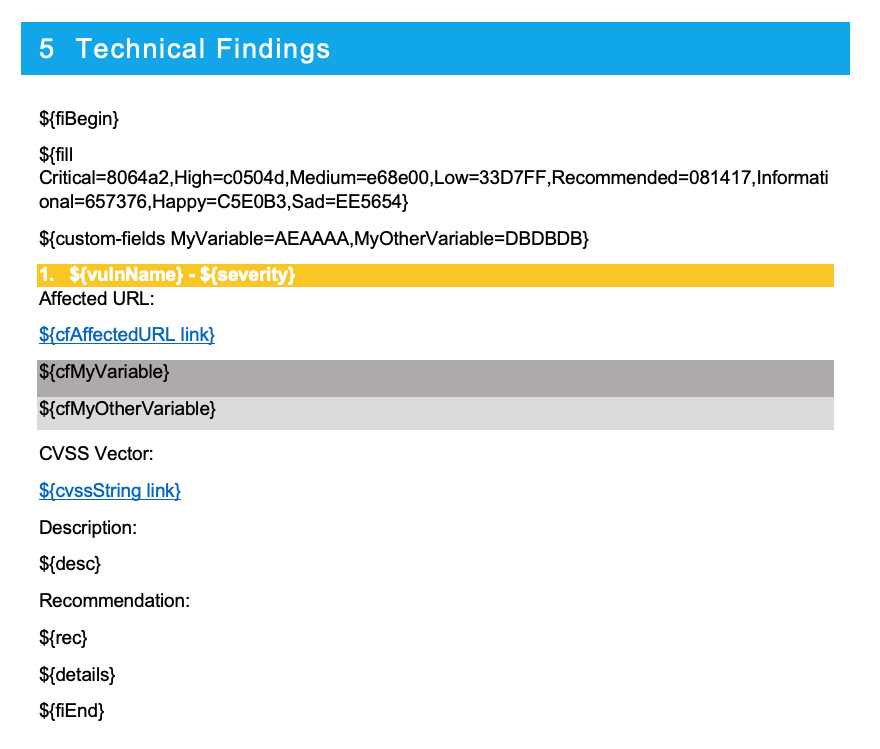
To demonstrate this, we are going to create two custom variables, ${cfMyVariable} and ${cfMyOtherVariable}.
Set the background color of ${cfMyVariable} to AEAAAA and the background color of ${cfMyOtherVariable} to DBDBDB in our DOCX template. These values can be anything, as long as they're an RGB HEX code. We chose these just so they stand out in this example. Once configured it should look like this:
Now add the ${custom-fields} variable at the top of our vulnerability findings block. This variable maps a custom field to a color we want to change when the report is generated.
We can now set the color based on the text that gets entered into these fields. Lets say if the text displays "Happy" then the background will be Green and if it says "Sad" then the background will be red.
We can add these colors to the ${fill} variable. It will look something like this:
${fill Critical=8064a2,High=c0504d,Medium=e68e00,Low=33D7FF,Recommended=081417,Informational=657376,Happy=C5E0B3,Sad=EE5654}
The full config in the DOCX will look like this:
When we add a vulnerability, we can select our Happy or Sad Option for these two Custom Variables:
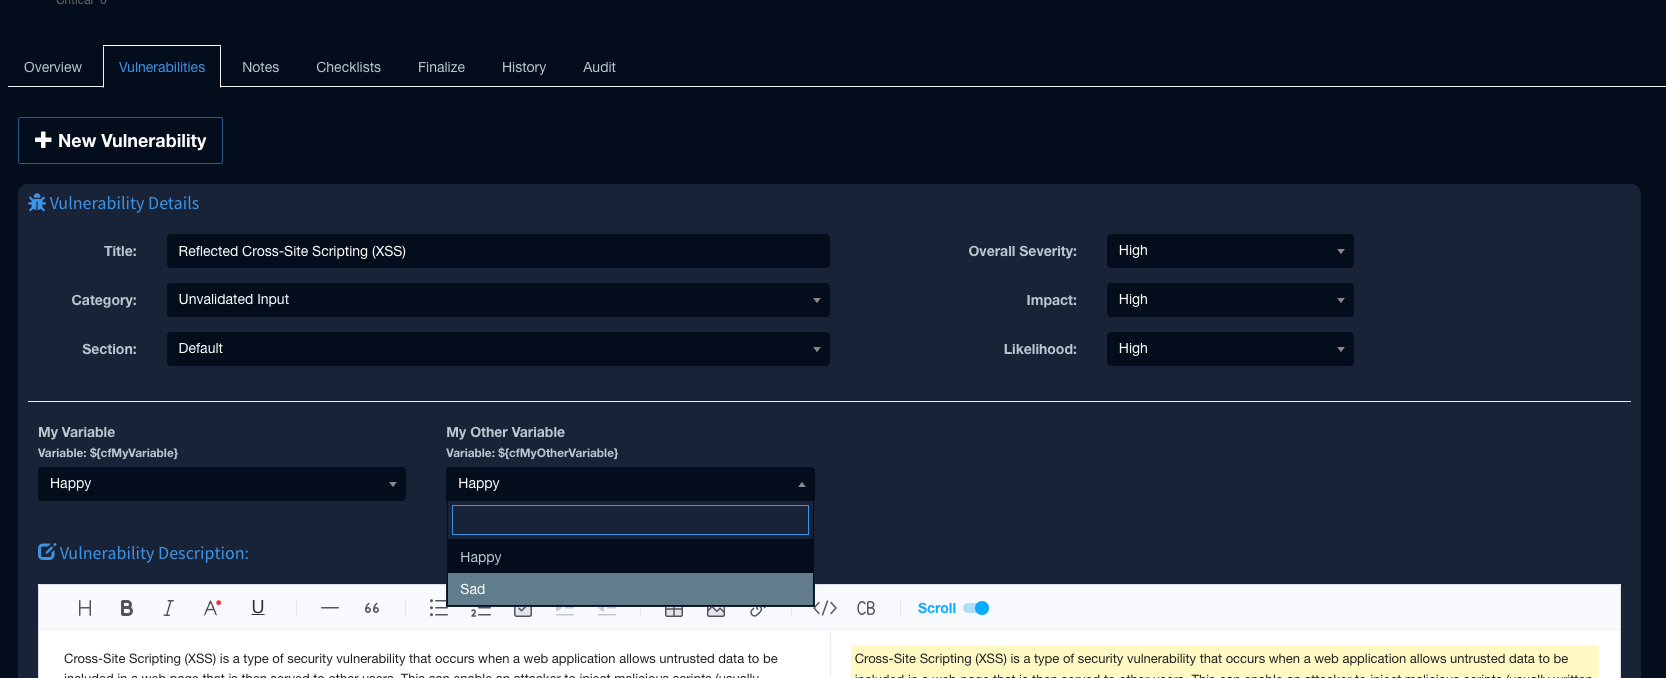
When we generate the report, these backgrounds get updated accordingly.